Wednesday, June 19, 2013

Yet Another Antique Spoon Pendant (but this one's good!)

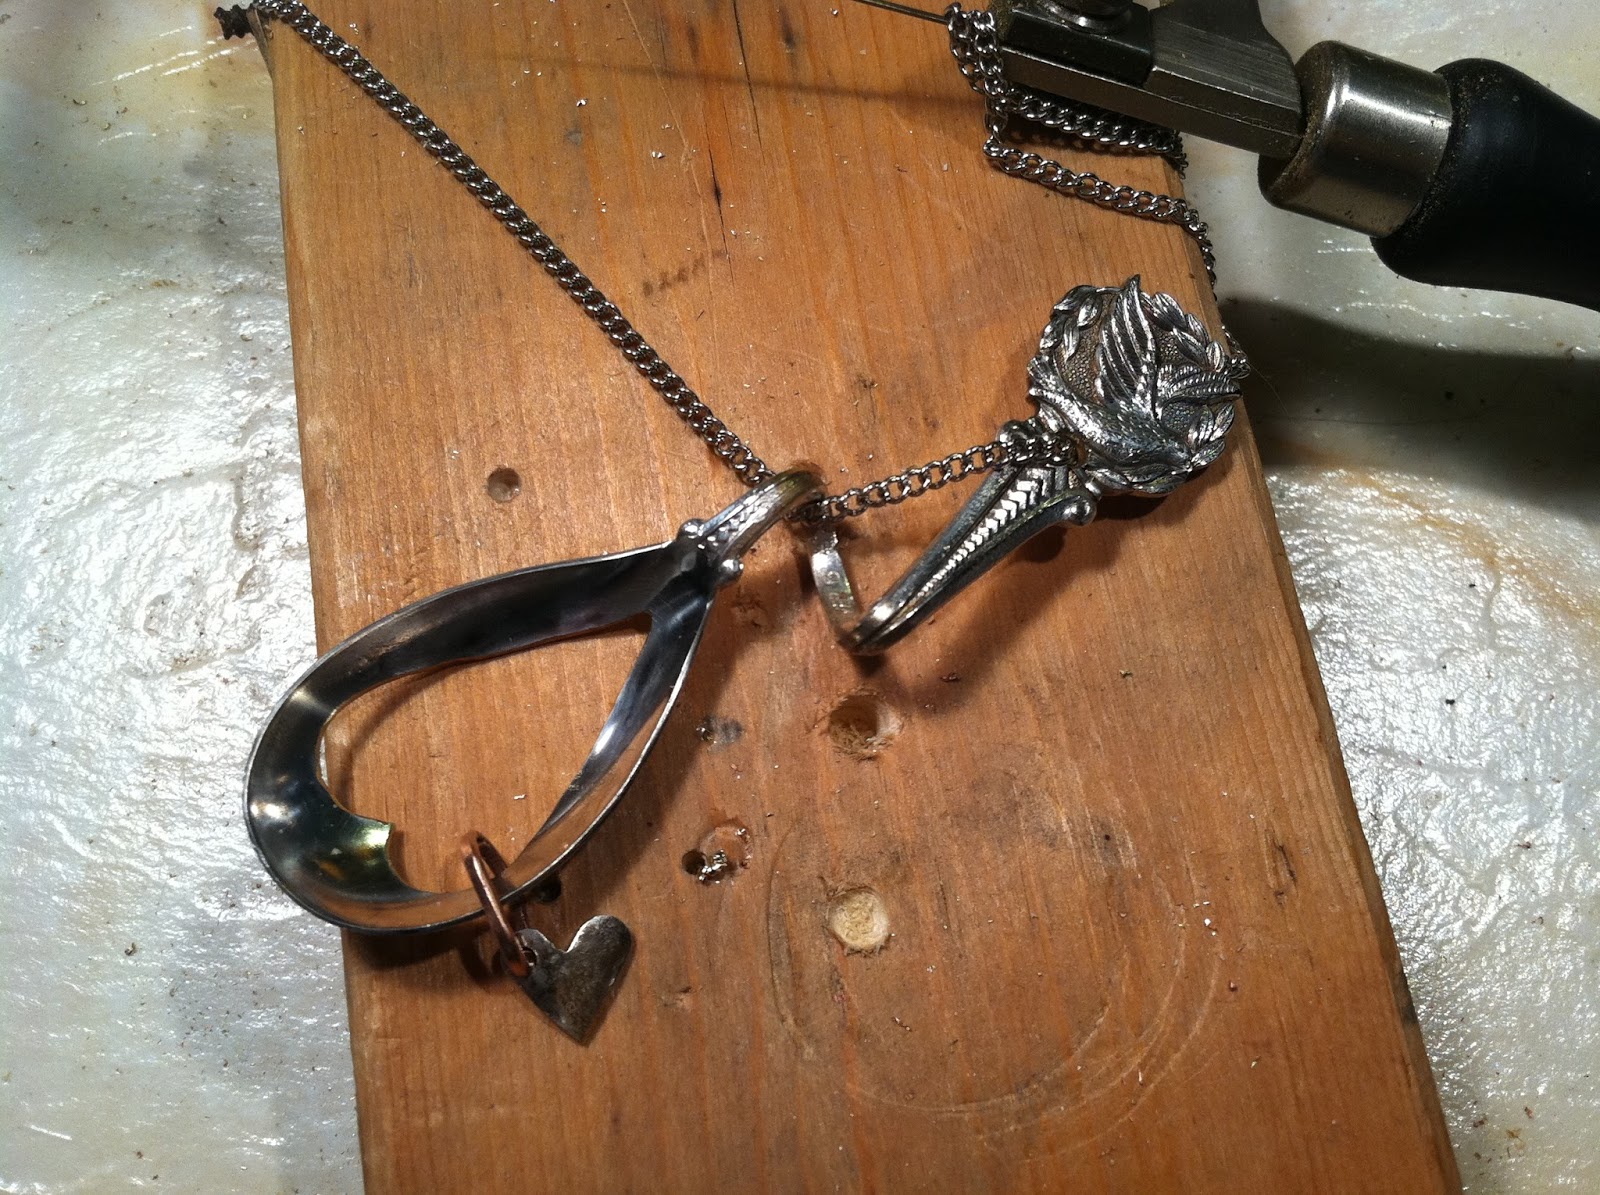
Yeah yeah yeah, I know, there are millions pendants made from antique spoons and forks out there, but this one's special so shut up! Actually, I read some tutorials just to see exactly how to do specific steps and found they were either hard to find or lacking. Like one step would say "bend the handle into your desired shape" and I was all, "ok, just tried that and broke my pliers in half, got any more tips on how to properly bend a spoon?" or they're all about how to manipulate sterling silver spoons and I'm like, "pshaw like I have the pocket change for a sterling silver spoon to screw up, all I can afford is silver-plated.' Woah, sorry, I swear that's not how I talk in real life, just inside my head. Anywho, moral of the story is I'm going to attempt to explain, in detail, exactly how I made this pendant. I don't have pictures of the pendant mid-creation unfortunately, so sorry about that. I always think about it then I get so into it I'm almost done before I snapped a single picture so you'll have to use your imagination. If there are any questions feel free to ask, although no one reads this so you'd be the first comment ever! Yay, go you
My poor broken cocktail fork, sacrificed
in the name of art
  1. First, find your spoon. For this project I suggest one with a fairly narrow handle/neck and a large, not too deep bowl. This makes it easier to bend into the tight coil like this one is and also to cut out whatever shape you wish to cut from the bowl. I got mine from an antique store with a cornucopia of utensil, but you can find tons on ebay. I'd suggest buying some really cheap pieces to practice on, which I wish I had done before snapping this poor little cocktail fork in half on my first attempt :(
  2. Next, do some sketches to gauge what kind of shape your spoon will ultimately have. A great tip for doing this is to trace around your utensil onto some scrap paper as close to it's outline as possible. Then, cut it out so you have and exact copy of your spoons size and shape and know exactly how much neck you'll have to bend and shape. Otherwise you may over-estimate how much you have to work with and not end up with what you wanted in the first place. Not that little mistakes turn into cool pieces, but in my case it saves a lot of energy swearing and throwing the spoon across the room… which of course I would never do.
  3. There are two main tasks in creating this piece: bending the neck and sawing out the shape in the bowl. I'd suggest sawing out the bowl before bending so that you'll have as close to a flat surface to saw. I used a sharpie to draw the shape of the heart and get the right proportions and size for the shape and size of the bowl. If you mess up some rubbing alcohol on a cotton ball easily removes the ink without damaging the metal. 
    • To saw your piece, you'll need to pierce a hole in which to insert your saw blade, unless your shape happens remove the rim. I used a pretty heavy duty drill bit in a hand-drill right in the middle of the heart. The closer to the edge of your shape the less sawing you'll ultimately have to do, but since this was my first time doing this exact procedure I left a lot of room for error in case the drill slipped and scratched the surface. Before drilling, use a center punch to make a divot that'll grab the bit and make it easier to drill.
    • Once you have a hole, insert one end of your saw blade into your jeweler's hand saw and tighten the wing-nut, then insert the other end of the blade through the hole you made. Holding your saw so that the blade is perpendicular to the bowl (or as perpendicular as possible since the bowl is concave), put the blade end into the other wing-nut into the
      How to tension your saw blade (but
      that's not me, I swear I'm not that
      hairy)
      saw and tighten. I happen to have a saw with an adjustable tension screw, but if you don't press your saw into the edge of your table and tighten your blade so that when you release the saw it adds tension to your blade. Try holding your spoon so it's not adding any weight to your blade and taking away any tension. I used a heavier size blade for this part since spoon bowls tend to be fairly thick.
    • Start sawing towards the edge of your shape, making sure to ease into any curves. Unless you're very adept at sawing, err on the cautious side and cut slightly inside the edge so you can just file the extra metal when you're finished. It's always easier to remove too much material than to put it back… in fact it's impossible to put it back. Slowly and steadily cut out your shape. Hold your saw perpendicular to the surface you're sawing through, use your should and not your wrist, and don't move your saw too much unless you're in a particularly tight shape. It's best to move the piece you're sawing into the blade of your saw rather than holding the spoon still and moving the saw around. Think of it as using a sewing machine. You move the fabric into the path of the needle and not the other way around.
    • Once you've finished sawing out your piece, release one end of your blade and remove your saw. The edges will probably be jagged and sharp, so file the edges using a half-round or round file for the majority of the shape. To get a sharp point on the bottom of my heart I used a triangle file making sure not to cut too deep into the surrounding sides. You can also further soften the edges using sandpaper, but I didn't see a need to. Since the edges are inside the spoon they don't come in contact with your skin or clothing and so they don't have to be too perfect.
  4. An easier and quicker way to remove the material inside the spoon is to use a dremel or any flex-shaft tool like a foredoom (but those are crazy expensive and I can only afford one in my dreams). The dremel piece you'd use in this case is a tungsten carbide cutter, which comes in 
    The Dremel tungsten
    carbide cutter I use
    several shapes and sizes that you can find on the dremel website. I own this one that does a good job cutting and carving through metals of many hardnesses, thicknesses, and material. You need to start out by drilling a hole as if you're sawing, but you need to use larger and larger drill bits, working your way up to a pretty big hole. With these attachments you're supposed to start with a hole at least twice the diameter of the tip of the cutter, which I alway do… right? Anyway, I didn't use this method because I wanted a little material to make the little heart charm hanging from the spoon bowl and the tungsten cutter turns the metal you've removed into dust. I suppose you could cut
    around the inside of the bowl, but most spoons small enough to wear as a pendant wouldn't have enough material to actually do this. You'll most likely end up with a slightly cruder shape so you will have to file more material to get your exact shape, especially if you have any points. There are some tungsten cutting bits small enough for decent detail, but it's just safer to file since you have a lot more control.
  5. Once you're happy with the inner shape you will bend the neck into whatever shape you'd like. Most spoons would be a little cumbersome to wear without bending the handle at least a little bit and it adds nice detail. I wanted my spoon to hang in a unique way, which is why I chose this particular loop. I destroyed some pliers on my first attempt to bend a handle, but I did use some Mickey Mouse pliers and heavier duty pliers may do the job, but they might also mar
    My loverly vice, which doesn't
    actually suction all that well, but
    it's not that necessary for the
    projects I use it for
    your metal, which I have a bad habit of doing. Instead I got a vice that suctions onto my workspace, but that's just because the edge of my counter is far too thick for a clamp-on vice which would be more secure and sturdy. It also has rubber jaw covers that protect whatever is being held and swivels and rotates so it'll hold my project in the exact-right position. I clamped the end of the spoon handle and bent the other part with my hands, no need for heavier-duty tools thanks to the vice. Depending on your intended shape you might need pliers to get the right loops and curls. Once I got the initial curve right, I use pliers to bend the exact shape I wanted. I chose this spoon because the neck was
    really narrow and pliable so getting the tight curve wasn't difficult. To get it even tighter I clamped the whole thing into the jaws of the vice and tightened it so smoosh it flatter. I wish I'd taken pictures mid-project to illustrate what I'm talking about because as I type this it's very obvious how unclear this particular part of the tutorial may be. Essentially, carefully manipulate your spoon handle into the shape you want using a vice or pliers or whatever get's the job done.
  6. Lastly, I drilled a 1/8" hole into the end of the spoon's handle so the chain would make the spoon hang in just the right way. Since I had the extra spoon bowl bit leftover I decided to make a little heart charm to hang off the bottom. I hadn't planned on doing this, but I'm glad I had just enough to make the baby heart. For this I used the tungsten carbide cutter to make the basic shape, filed it into the final shape and to soften the edges, and drilled a hole. I used some 16 gauge copper wire to make a jump ring and soldered it shut around the edge of the spoon bowl.
And voila! You've got yourself a spoon necklace. There are many different sizes and shapes of antique spoons out there to make a unique pendant of your own (read: don't copy my exact design you moocher!)


Wednesday, June 12, 2013

Not So Straight-Laced

   This piece is a little bit hard and a little bit soft. It's like leather and lace… but perhaps a bit less kinky. After making my mother's necklace using resin I tried to think of some other projects I could use it with.
    I've always adored the way lace looks on bare skin, but I feared a necklace made from lace alone would be far too delicate and tear. Resin was the perfect solution to this conundrum since it would add a lot of strength and protect the fine threads. Plus, this way I could add little embellishments like seed beads and firmly attach it to a metal "frame." This post will be a proper tutorial on how to complete this project, but I'd encourage you put on your creativity had and find another material to encapsulate in the resin (read: don't copy me! then again I'd have to have actual readers to be ripped-off).


1. Pick your lace and make a frame

First I chose the part of the lace design that would be a good size and pattern to place on your upper chest. Once I found the piece I liked I cut it out, make sure to cut the lace piece big enough so that you have extra fabric to glue your frame to it. I traced through the holes in the lace on a piece of paper to make the inner outline of the metal frame I wanted.  Then I traced around that about a half inch or so.
Then, I glued the pattern onto a piece of 30 gauge sheet copper with a silver-colored finish and cut it out using french shears. Since the metal is so thin I didn't have to bother with my jeweler's saw. Once cut I use some needle files (half-round and round mostly) to remove the sharp edges. I also had to use some pliers to straigten out the frame since it got bent in the cutting process. I even attempted to cover it with some books and dumbbells, but that didn't help much.

2. Glue your lace to your frame

For this step I used some decoupage glue to attach the lace to the back of the frame. In hindsight some E-6000 would probably have worked a little better, but once the resin was poured that helped really stick the two together.  I sandwiched the frame and lace between two pieces of wax paper and heavy books, then stacked some barbells on top of those books for a couple hours.

3. Mix up and pour your resin

I used a jewelry grade epoxy resin that comes in two parts (Envirotex brand) that is easy to use, safe, and has yielded some great results. Make sure to read the instructions it comes with, but it's basically a 1:1 mix that you stir together in one cup for 2 minutes, then transfer to another cup and stir for a second 2 minutes. The 1:1 ratio must be exact (they include a measuring cup) for it to set right so don't just eyeball it. Once mixed you have 30-45 minutes before it's too far set to pour so don't dilly-dally.
Before mixing my resin I set up the frame and lace. Resin sticks to most everything so I made my piece on top of wax paper. The wax actually left a little residue stuck to the back, which I liked since it created a kind of textured look, but if you want it crystal-clear I would suggest parchment paper of a
layer of two of plastic wrap actually works best. I put the wax paper and then the frame and lace on top of a couple layers of carboard so that I could use push pins around the outside of the frame to hold it exactly level.
Next, I poured the resin. Make sure not to put too much on at one time or it could run over your edges. It's not a disaster if it does, you can wipe it up with a cue-tip dipped in rubbing alcohol while it's still liquid, but once it runs over it tends to keep going and can be a little bit like a river so it's best to avoid that in the first place. I poured just enough so that it kind of domed over and was thick enough so that none of the lace threads still showed tecture through. Use a cheap (you can't clean and reuse a brush with resin; it has to be tossed), but soft paintbrush to guide the resin around the edges of the lace and to the top edge. If it goes over that edge it's not a big deal because you can trim that with sciccors after it sets, but for a nice edge try not to go too far.
Last, I embellished the lace with meticulously placed seed beads on the leaves of the pattern. Since the lace was black, the beads, which matched the color of the metal finish, higlighted parts of the pattern that might otherwise be lost. 

4. Wait…

Resin takes 24 hours to soft-set and a full 48 hour minimum to fully set. It also needs to be in a temperature between 70-80 degrees F or it may get cloudy if it's cold. My workspace is in my basement where it's a little chilly, so once my piece wass ready to cure I put it in a box and then placed a piece of paper on the edges of the box so dust wouldn't fall on it while it was drying. Then, I set a lamp over it to provide some heat.
After 24 hours it will be set enough so you can move and touch it a little without ruining it. I checked to make sure there was no runover. There was a tiny bit on the top edge so I used an exact-o knife to cut that off and hopefully the edge would be a little softer and not sharp once it fully cured (maybe it would flow a tiny bit and soften the edge?) This was one of my first resin projects so I wasn't positive about what to expect.

5. Finishing touches

I wanted to add an antique-y kind of feel to the metal frame so I engraved some swirlies to emulate the pattern in the lace. I drew the designs with a fine-tip sharpie, which can easily be removed with some rubbing alcohol if you change your mind/mess up.
To engrave the metal I used a dremel with an engraving tip. I love my dremel for jewelry projects so much because it's affordable; you can get a kit for about $50 with all kinds of gret tips plus plenty more options you can get on their own. I also got a flex-shaft attachment with a more flexible, pencil like hand-held piece for delicate projects like this. It takes some skill and getting-used to, so practice your designs on scrap metal before hand so you don't ruin all of your hard work. You could also do this before you attach your frame to you lace so if you mess up your can cut a new frame without losing the lace and resin, but I hadn't thought of engraving the metal until after I'd gotten this far. I also used some 600 grit sandpaper to distress the metal here and there for an added antique look.
Finally, I drilled some holes on the top of the metal frame where I wanted to attach it to the chain. For even more curlycues, I formed some 16 gauge metal wire into swirls, then forged it on a little anvil with a ball-pein hammer. I threaded the back of the metal through the holes, formed some more swirls where I could attach it to the chain with some jump rings, then forged that part, as well. Then I used oval jump rings to attach the chain and a lobster clasp.
Voila, you've got a permanant lace necklace to wear with anything from a simple top and jeans or a cocktail dress. This same method can be used for all sorts of material from lace to cotton patterns or any kind of fabric embellishments.

Tuesday, May 14, 2013

Mission Accomplished!

Does anyone know Bush's number? I'd like to get one of those banners…

Anyway, just a quick post 'cus I'm just so excited about my project's result. I finally got to give my mommy her B-E-A-U-T-I-F-U-L necklace that I've been peeing my pants in excitement to give her. And (drumroll please)… here it is:


 Isn't it lovely? I think it's lovely. It's lovely, huh? I'd bet anyone else would call it lovely. lovely seems like a good way to describe this, no? I think I'll keep this short and sweet and just give a quick description of how this lovely (wouldn't you say it's lovely) necklace came to be.

First I ordered the tiles online from eBay. I was going to steal, I mean borrow, the tiles from the family Scrabble set, but we have a "deluxe" version with ugly maroon tiles (gag me with a spoon, right?) so I just got the ones I needed from the many weirdos on eBay with a strangely endless stash of Scrabble tiles. What, do these guys buy out all of sets from Target and Walmart, take the bags of tiles out, then return the games? Do they go to their friends' houses during parties and steal their tiles? What kind of sick people are these eBay sellers of Scrabble tiles? Anyway, so I took the tile, drilled them where I wanted to hang them from the necklace at, then eyelet-ed them with mixed metal eyelets. For the blank tile I wanted a Heart so it would spell "I Love[heart] YOU MOM,"  but nixed the MOM because it was gonna be way to long. Anyway I cut a stylized heart out of copper, engraved it, then "fire-painted" it until I got the right effect. That whole process is a post in and of itself so if I get bored or someone actually wants to know (i.e. I get actual readers and on top of that those readers give a damn) I'd be happy to explain how I got that beautiful pink and copper heart. I glued that sucker onto the blank with some E6000 (gotta love that shit, it glues everything). and voila, my letter tiles are finite!


Next, the picture frames. I used Shrinky Dink plastic (I know, I know, I can't get away from that stuff. But it's just so perfect for every project!) that you can use in an inkjet printer and found some cherished family photos. I got the color and size correct to make little Scrabble tile-sized charms (this process wasn't easy, either, definitely trial and error and error and error and kind of success and error and error and… oh, sorry, ummm, yeah, let's say after that many errors I'd succeeded. Once I have the 4 pictures I wanted to use between the letter tiles I cut some metal blanks that would fit around the pictures, used my Dremel to remove the metal from the inside of the blanks to create a tiny frame, and filed the edges down so they'd make proper charms for the necklace. Then I engraved little designs on the frames so they really looked like picture frames. I glued the pictures into place behind their respective frames (yes, with E6000 again), but then I wanted something to make them really special. I got a 2 part epoxy resin kit (EnviroTech Jewelry Resin, to be exact; worked perfectly I highly recommend) and "glazed" the pictures where they showed through the frame so that the pictures looked like they were under glass. The effect was awesome; you can't quite see it in the pictures, but the glassy resin made it look like teeny tiny frames with teeny tiny pictures that you'd hang on the wall.

To finish it all off, I hand formed some 16 gauge wire into decorative links and hammered them for an antique-ey look and attached the Scrabble tiles onto the links, added the chain and a clasp and Doo to do do! (ugh, ok that was supposed to be like the bugle playing and little announcement of a success? Right? That's totally what you thought when you read that, right? No? Well, screw you then!) My masterpiece was borne! But seriously, it took weeks and I worked so hard, screwing up everything that could be screwed up, not understanding why some things weren't working or how to fix it and then worrying that whatever I came up with wouldn't be good enough (even though I knew my mom would love anything I made for her), staying up at night not sleeping because I didn't know how to fix my most recent screw-up, but too tired to stay up and experiment with how to do it. If anyone wants details on any specifics, I'd be happy to share, but to go through an entire tutorial on how I got from beginning to end (because the steps I just went though up above are like, 1/100th of what I really did) would take forever and no one actually reads this so it's a lot of work to do for nobody.

In the end, my mom cried. She was so touched and impressed she almost couldn't speak, but kept saying over and over, "This must have taken so much work!" which, of course, it did, but I just wanted her to love it, so it was all worth it in the end, without a doubt. I also made her a kickass card, which I'll snap a few pictures of and share those, too!

So much for short and sweet.


Wednesday, May 1, 2013

Objective: Make My Mommy Cry

… geez, never thought I'd ever think something like, "this better make mom cry," but I'm working on a mothers' day gift and my goal truly is to make her cry, either tears of joy or sentimentality. This project has kind of taken over my time and sanity, so other projects are being shifted to the back burner, but a quick update of my previous projects:

  • I have managed to almost finish my spoon wreath. It has taken a lot more time and energy than I had anticipated, mostly because, as usual, I've managed to take the most difficult route possible. I chose to use spray paint for the spoons even though everyone else advised to paint them individually after gluing them down, but I thought that would be tedious… how wrong I was. I also decided to add a flower made from melted and manipulated plastic forks, but it's making this project a whole lot more difficult since I have to melt the spoons heads to fit around the flower, but then I have to re-paint them after melting since it messes with the paint and so on and so forth, ugh why do I have to be so damned creative! It's a gift… and a curse. Anyway, I'm on the home stretch with this project and since my mom wants to show off the finished wreath when she has friends over this Friday for cards, I'm on a deadline. Fortunately for me, I work best under pressure and even better under an oncoming deadline so I'm sure it'll be done in time. My mother better thank me for this, I know my lungs will after all the spray painting I've been doing with little ventilation (shhh don't tell my parents)
  • I have also stopped my the Oak Park Women's Exchange shop to drop off my application and assorted pieces for jurying. It wasn't the same place I thought it was (I mistook it for a cute little boutique in the shopping district of Oak Park Avenue) and it's actually, well, to be honest, dumpy. It's full of some really craftsy looking stuff, not to make craftsy a dirty word, but everything looked like grandma's doilies and quilts or kind of, well, amateur looking jewelry. Not that I'm a pro by any means or that crafts aren't worthwhile, but a lot of the jewelry looked like something you'd make with a kit from the kids' section of a craft store or just strung some nice beads on a wire. When I left my pieces with the ladies on duty at the time, they were a bit ditsy or clueless and I just didn't feel like I fit into the style of the place. I wasn't going to say anything, but even my mom thought  was a little too good for the store. I may still go with the plan to join the group just to give it a chance and see how it goes. Even if it's a little disastrous, maybe I can get a whole bunch of supplies with their wholesale discount and leave after a year. But, all one all, I left with my heart in my stomach since it felt like such a let-down, oh well.
  • The rest of those projects are still in various stages of completion, or non-completion if you want to take the pessimistic look at it, which I always do. One of the most difficult parts of trying to sell your art/crafts seems to be the last couple steps, mainly photographing the pieces. First of all I'm terrible at photography and since I'm such a night owl I have few hours of good, natural light in my waking hours. And, of course, I have to lug out all the "staging" supplies like my bulletin board and neutral sheet to photograph everything against. It's all such a pain in the ass so I try to do as many pieces at one time so it means I have a bunch of stuff waiting until I have the motivation, which seldom happens since my Etsy shop (and most endeavors in all things crafts) have been monumental failures. Blarg.
Whoops, got way off topic again so here it is, my mothers' day project: a Scrabble and picture frame charm necklace. My mom loves Scrabble, I mean, LOVES it. She plays it online with as many friends as possible and whenever I ask her if there are any chores/tasks I can help with her first reply is always: a 100 point word for my Scrabble game. Always. And any time she says "shoot!" or lets out a sigh of frustration it's because one of her opponents took her perfect spot for a bingo word (a word that uses all 7 tiles at once and get 50 bonus points). So I thought I'd get some tiles that say "I [blank] YOU MOM" using the blank to carve a heart and make them charms on a necklace. Adorable, no? Yes, that answer is yes it's adorable. Well, as per usual, this idea evolved, or rather, snowballed, into: what if I decoupaged pictures for charms? into: how about little charms of Shrinky Dink pictures (you didn't think I'd forget about using the dinks for this project, did you?) then, how about I put the dinks in frames somehow? and of course I'd stay awake at night brain-storming the perfect way to combine all these ideas and finally arrived at my current plan. I am drilling holes into the Scrabble tiles, then using mixed metal eyelets in the holes to make them look more finished. I used the inkjet Shrinky Dink plastic to print old pictures of the family when my brother and I were still cute to make little charms. I then cut out metal frames, used my Dremel to remove the inside of the metal blanks and engraved designs into the metal to look like real picture frames. I glued the pictures behind the frames and the final step will be to use an epoxy resin to "dome" or glaze the pictures to bring out the colors and make them looked finished. I've never used resin so that'll be a new adventure for me.

I'm still between steps for finishing this project, it'll be a few more days at least until this necklace is done since it has to be perfect or I'll lose even more sleep over this. I'll keep you updated on my progress and if the resin experiment works out so keep checking in!

Saturday, April 20, 2013

Jack of All Trades, Finisher of None

Oh dear, I haven't posted in a while for two main reasons: 1. I don't real have any readers so each post makes me feel increasingly like a crazy lazy talking to herself, or maybe a little more like my dad who talks to himself while he does things explaining, to himself, each step he's taking and 2. I have been in the middle of about a bazillion different projects (ok, maybe less, let's say more than 5 less than 10?) and have yet to really finish any of them (hence another ever so creative post title) and I tend to feel like posting about my finished projects. So, instead of a tutorial explaining a project I just did, I'll share with my many many readers the many many activities I find myself in the midst of.

And here they are:
  1. A plastic spoon wreath for my mom to celebrate spring (or summer at the rate I'm going).
    Normally I don't like to read other people's tutorials on complete projects because I like to get inspiration and come up with a project on my own. I feel as if following someone else's instructions on his or her idea from start to finish is kind of cheating at worst, unoriginal at best. But I did see someone's spoon mirror and thought, well isn't that just lovely, and my mom just loves lovely things so I thought since I am her lovely loving daughter I would make my lovely loving mom whom I love a lovely thing because she does so much for me since she loves me and I am lovely… ok, enough of that, I truly apologize. Anyway, she loves green and she loves, oh, sorry, she likes green and flowers, especially peonies, which the spoon mirror I originally saw kind of resembled (although the author of the tutorial likened them to chrysanthemums) and put the two together to make a wreath for the front door with different shades of green in a sort of ombre effect. To add my own little twist, I thought I'd melt and bend some spoon "petals" combined with melted and shaped plastic forks to make little flowers to sprinkle here and there amongst the green spoons. Usually this is a project I'd bang out in a matter of a day or two, but since I have to spray paint the spoons, which requires daylight and going outside, and I am a major night owl, it is taking me a lot more time to actually go out and spray the spoons and create at least 6 different shades of green. But I am determined to get up at a decent hour this weekend and paint the 150+ spoons I just spent the night before cutting from their handles.
  2. Yet another spoon related project. I finally finished my heart/peace dove/bent handle pendant from a vintage silver plated spoon I found at an antique shop, but while perusing the vintage
    Chicago Spoon won on Ebay
    spoons on ebay I found a Chicago-themed spoon and came up with the brilliant idea of cutting out the 6-pointed star found on the Chicago flag (I know, I know, I am obsessed with Chicago and its flag) and make a pendant in the same vein as the first one. I have only just received the spoon in the mail so that's my excuse for having done little to nothing with this particular project. This one may be easier than I'd initially thought, however, since I just found the tungsten carbide cutter for my Dremel that makes quick work of cutting out chunks of metal, but it also means I have no spoon innards to save for making a little charm to hang off of the pendant. Oh, the sacrifices we make in the name of art… of convenience…
  3. Several other utensil-related projects, which I will lump into one project together. This includes a couple fork pendant. One of the fork pieces will be an attempt to solder the poor little cocktail fork I snapped in 2 back into 1 so I can bend it into a heart-like shape. I do love making things into hearts… Most of the other involved banging the utensils with a hammer on my vice, which means yet again I have to get out of bed during the waking hours of the rest of my family so that my dad doesn't have to come downstairs at 4 in the morning to remind me how much noise I am making… whoops.
  4. Yet another heart pendant with a pair of scissors, a spool of thread and a needle all made with mixed sheet metals and wire on top of a pink heart made from, you guessed it, shrink plastic!
    "I Heart Crafting" Pendant, finally finished!
    This one is actually almost done, but I'll put it on this list since it's been on the docket of "things to finish" for a while too. As usual, it was the steps that required daylight that held this project back. I wanted to make each half of a scissors out of different metals and assemble it almost like a real pair so I needed to drill a hole into the metals and then into the heart to assemble the whole thing together; then I used the tungsten carbide cutter on the Dremel to cut out the handles (with a heart in one of them) to finish the look. This time neither cold connections (rivets, eyelets, etc) nor soldering could connect all the pieces so I resorted to glue (which I try to avoid) to assemble the pendant and it turned out looking pretty cute, if I do say so myself. I used something called E6000, available just about everywhere, for sticking the metal/wire spool and shrink plastic measuring tape onto the background heart, which worked out nicely. The only part I'm not thrilled about is the super glue I had to use to glue the needle onto part of the scissors definitely showed on either side of the needle where it smeared and it's pretty noticeable, in my opinion at least, but I tend to notice everything about my own pieces, especially flaws, so who know what it looks like to other people. This pendant holds a special little place in my heart (he he) for some reason, maybe because it's so cute, maybe because it feels so idiosyncratic of my own obsessions, or maybe, just maybe, it's because it's a pink heart. Stick a Chicago flag or a red 6-pointed star somewhere on there and it would never leave my own site. Which leads to the next unfinished project…
  5. Chicago flag earrings… made from shrink plastic… and involved fusing shrink plastic… I'm sorry, I really am, but these certain obsessions keeping creeping back into my crafting repertoire. These are most likely going to be gifted to a friend, but I have another version of these that I'm hoping someone might actually buy from my Etsy shop. The finished-ish pair is the Chicago flag, except one of the stars is replaced with a heart (I know, I know, it's adorable if that helps my case any) with an enlarged 6-pointed, red star hanging below the flag from the ear wire. That version is finished and probably on its way to a friend in the near future. The version for sale has the same flag, but instead of the additional star I made a grayscale "charm" of the Picasso sculpture in the Daley Plaza that will hang alongside the flag, but the Picasso is bigger than the flag. I normally don't like even numbers, especially when a piece only has 2 components so I will definitely be adding at least 1 more aspect to these earrings. Perhaps I'll keep the enlarged missing stars from the flag, or think of something else, or both options, who knows. I am experiencing a bit go creator's block with this piece at the time being. Maybe a hot dog charm can join the flag and the Picasso? Hmmm… I kind of like that, although I won't be able to decorate it the way I eat 'em since I love lots of ketchup, yes,, ketchup on my Chicago dog! Blasphemy, I know, so for the sake of my reputation as a lover of all things Chicago, this dog will get mustard and maybe some nuclear green relish.
  6. Yet another pair of gift earrings I am attempting to finish for a friend holds the place of project #6 I hope to finish. Since I finally got a fused Shrinky Dink fish tank pendant/charm that satisfied my demands, I thought I'd make it into a necklace for a good friend with whom I've kind of lost contact with and wanted to remind her I still treasure our friendship (cue: awww), but the necklace itself feels a bit anemic so I wanted to make earrings to go with it. They have two enlarged goldfish like the ones in the tank, with separate air bubbles and a tank plant that will hang on separate wires to add al title interest. I'm almost done with these, as well, and once I am I'll take some pics and post them here along with pics of the other projects as they (slowly) near completion.
  7. This project is of utmost importance: I need to collect 4 pieces to submit for jurying at Oak Park
    Where it all started: Chicao Wallet
    Women's Exchange along with my application to join the collective. They are a little shop in Oak Park that feature only handmade goods from their members, ranging from stained glass to jewelry to embroidery and all sorts of other great stuff. Once accepted, members only pay a yearly due and have to work 8 hours per month at the shop. For that, they get to sell their pieces in the store at only 15-20% commission (which is an amazing rate if you didn't know), a free booth at a huge  craft fair in the fall, wholesale prices on  supplies, along with a couple other perks. This sounds like it's right up my alley, since I seem to be awful at selling stuff online and "networking" through twitter, Facebook, blogs, Etsy, etc. and very much prefer having a chance to interact with a customer and let them not only see, but feel my pieces. I need to pick the 4 lucky pieces to represent myself. Problem is, they can't be up for sale on Etsy since I need to ship those right away in case they sell (not a huge concern, obviously, but you never know). So far I've decided on: a Chicago wallet since they show my sewing skills and personal style (and I have like, 7, so it's no big deal if someone buys one online): a pair of jellyfish earrings that also show my style and use of different materials; instead I was going to use a bird and nest pin set, but they both sold (yay!) so I may use the hair piece I made in the same vein recently, which shows my skills with metal along with style and unique point of view; and lastly my spoon pendant, which also shows my skills with metals and unique way of working with materials (I also intend on keeping it for myself so I don't have to worry about a sale on Etsy). This is my list so far and I probably won't end up changing it anyway, but they jury only once a month on the last Tuesday, which is a week from this coming Tuesday, so I need to get to it so I can start getting truly involved with other artisans and possibly start selling more.


Well, I can actually think of a couple other projects I am working on, but I've already bored you to tears with a wall of text with nothing other than the ramblings of someone with too much time on her hands and too few people to talk about her projects with. If you're curious about any projects and would like a tutorial or want to see pictures of anything I've talked about, please let me know, I'd be more than happy (read: desperate) to share even more with you


Tuesday, April 9, 2013

Heavy Metal Poisoning

1st project after getting back into metals
As of late I've gotten my hands back onto metals and it feels sooo good. Years ago, I had taken a jewelry/into to metals, semester-long class, which I loved and had wanted to take for a very long time. Since it all involved saws and torches and crucibles with molten metals, I had kind of cast the idea of working with metals on my own out of my mind until I was a world-famous fashion designer and have my own studio, so, you know, I'd have to wait a year or two. Then I got an opportunity to take another metals class in college, but realized upon reading the syllabus that the class was identical to the one I'd already taken. I mean, identical; I wasn't going to learn a single new thing, but it would take up a good 20 studios hours a week on top of the lab hours way across campus when I didn't have a car and had recently started experiencing health issues that severely limited my physical abilities. Add to that the fact that it had nothing to do with my major or graduating and was taking the class "for fun" (which I discovered doesn't really exist in college classes when you're scrambling to make up relevant hours so you don't end up as that 27-year-old sophomore who crashes frat parties during rush week and hits on the freshman boys who probably aren't even legal, but maybe I could get away with that since I'm asian and already look 10 years younger than I am already and… oh, sorry, I digress…). Long story short, I had once again abandoned the medium I once declared my love to. Well, as I stroll around Michael's a couple weeks ago while trying to sneak as many craft supplies and beads into my cart so my mom will pay for them I stumble upon some sheet metals, metal shears, eyelets, dapping blocks, etc. and realize that perhaps working with metals is once again within my reach! Granted, I couldn't sneakwith my that much without my mom realizing so I shelled out a chunk of change I had saved from Christmas (yes, I'm a 12-yet-old, I get it) plus that gift card I'd been trying with all my might to save and went home giddy as a little school girl.
My Evolving Jewelry "Lab"


Forget marijuana, beads are the real gateway drug. You start out with some string and pony beads, which leads to the more expensive wire and crimp beads, which leads to svarovski crystals and pendants and before you know it you're blowing every last cent on a new soldering kit, butane gas, a jeweler's saw and files, the whole shebang. If my mom every gets tired of my terrible spending habitsthat would be! Anyway, the point is, I have invested further and further into this hobby turned addiction, but I couldn't be happier. As I said in my previous post, the soldering has been put on the back burner (ha ha ha) for a little while until I feel I have watched a sufficient amount of videos and read enough tutorials to be confident my house won't be going up in flames. Ok, it may not be all that dramatic, but even though I've soldered before with a fuel system much more dangerous than the equivalent of a creme brûlée flamer I'm still hesitant to jump into it like I normally do. Well, lucky for me I am in no short supply of projects that need starting and/or completing, one of which is antique utensil crafting.
I'll have to remind her there are worse drugs of choice, I could have chosen to use diamonds or pure gold! Imagine how expensive

I've seen a plethora of jewelry pieces made from old spoons and forks and have wanted to do it myself for quite a while, but can never find the right utensils to start with. Sure, you can buy them online, but it
can get expensive and I really like to hand-pick my pieces and don't trust the internet for something like this. Needless to say I squealed with joy when I found a bounty of old silver-plate forks and spoons at a local antique shop and got myself a nice handful of interesting and pretty pieces to get started. My first attempt was a little bit of a failure, as I didn't do my due diligence of research on annealing metals and assumed I could just heat up a fork till it glowed and bend it, while hot.

My 1st Casualty
Things I learned:

  1. Annealing is not heating up metals so you can bend them while hot
  2. Annealing is actually heating up metal then quenching it, thereby softening it to bend while cool.
  3. Silverplate should never be annealed in the first place
  4. Last, and most importantly, 1+2+3= one sad broken fork (my favorite one, too)
I had reached a fork in the road (again, ha ha ha): do I once again abandon metals because they're more difficult, I'm not sure what I' doing, and they still scare me a little, or do I buck up, learn from my mistake, and try again (possibly sacrificing another adorable little fork? I decided to take the former option, this time googling "annealing metal" and reading past "heat the metal up until it glows a dull red" and actually realizing it needs to be cooled first and then realizing I didn't need to, nor should I, anneal my utensils. I will attempt to solder the fork back together, but for now I had my eye on my favorite spoon to experiment on (ok, I don't learn from all of my mistakes) . Of course, true to my form, I used this opportunity to buy yet even more equipment. Off to Lowe's I go to get a suction-down vice (my "workbench" top aka the bar in my basement is too thick for a clamp) and stainless steel sheet metal that I ingeniously clamped down to the table top with some big ass clamps then suctioned the vice down. I was then able to hammer and twist my new victim, a lovely little spoon, into the exact shape I wanted. I then drilled into the bowl and sawed a lovely heart out, used the piece of silver to make a tinier heart charm to dangle off of the negative space, and filed down all the edges. All without swearing even once! (yeah, right) I'm starting to really love this necklace, though, so this may become an Etsy casualty and end up around my neck instead. At least this is the first one… although my mom has poached several new pieces already, but she more than deserves it so I can let those slide. I could go on and on about the many metals project I've got going on right now, but I think I'll leave it here for now since this post (and all my others) is long enough.

Signing off,
kt

Sunday, April 7, 2013

New Etsy Shop Name

Hello All,

Lucky you! This post will be short and succinct for once. Just a quick announcement: I have chained my Etsy shop name to Crafty Diabeatles. If you go to the old site name, since I'm sure you've bookmarked my shop under "My Favorite Place to go on the Internet," it will redirect you for 45 days, but the new address is: www.etsy.com/shop/craftydiabeatles. If you're interested in why, feel free to keep reading.

When I first started the shop, I sold wallets and little mini wallets, which are adorable, of course, but I felt they were more of a craft. As I continued to turn my crafts into a business I added jewelry to the repertoire. Because I am most passionate about making jewelry, I tend to put a lot more blood, sweat, tears, and love into those pieces (not that I don't put everything in me into everything I make) and feel that my artistic talent is most represented in them. Thus, I feel my shop kind of transcends crafts (not that there is anything at all wrong with crafts); I also feel the Crafty is a perfect description of me in more ways than one. And so, bum ba da da: Crafty Diabeatles. Diabeatles is a pseudonym/nickname/alter ego I've used since I was pretty young, combining my love for the Beatles (if you couldn't guess) with the fact that my diabetes has been one of the biggest influences on my life, for good or bad… mostly bad to be honest, but it has shaped who I am more than any other factor I've encountered, other than my daily, perhaps.

Thanks for reading and I hope you return for another rousing post of my artistic exploits!
Diabeatles signing off

Tuesday, April 2, 2013

And last, but not least: Fusing! (yes, I'm still stuck on Shrinky Dinks)

So, my adventure into soldering hasn't quite begun yet like I'd wanted, mostly because I'm in the process of setting up an area where it will be easy and more importantly, safe to solder in. You know, those 2400 ℉ torches kind of scare me (ok, they really scare me even though I've soldered quite a bit with much more powerful torches before) and aren't something you just start "experimenting" with like Shrinky Dinks… which is a perfect transition to today's tutorial on fusing Shrinky Dinks, yay! In this post I mention several different plastics and modes of coloration and attempt to explain the different effects, but after writing this I may add another post solely about what I've found from my personal experiences using different media since I've read many contradicting information on other websites and even the shrink plastic's instructions.

2nd Fishbowl Attempt
Fusing is quite fun and gives yet another dimension to the wonderful medium that is shrink plastic. When you initially shrink a dink at 325-350 ℉, the plastic doesn't get hot enough to actually melt, but when you fuse, you crank up that temp to 450 ℉ and the plastic can melt and fuse several layers of preshrunk plastic together. Here are some instructions for fusing before I show you my results and the tips I would offer from my own experience:


  1. Pre-shrink your pieces. That is, color the plastic, pop it in a 325-350 ℉ oven depending on your plastic (remember, it needs to be baked on cardboard or glass, not metal), watch it shrink, squeal with glee as they get all curly and tiny and magical, take out of oven, let them cool, admire. Make sure to pre-punch any holes you may want if you're going to attach a jump ring for jewelry/accessories. Also, if the holes appear anywhere you're planning on layer plastic, line up the layer pre-shrunk and then punch. I'll use the Chicago flag as an example for these steps (if you ever visit my Etsy shop you'll see I kind of have a thing for Chicago and its flag). I cut out the back piece from matte Poly Shrink plastic and left it blank since it turns white after baking.
    Chicago Flag Close-up
    Then I measured the stripes, cut those out of crystal clear Shrinky Dinks and colored them with permanent marker. I started with a slightly darker blue since I new some of the color fades on the crystal clear plastic as well as when you use markers. Lastly I cut those damned tiny stars out of crystal clear plastic and colored them with marker on both sides so that they would remain truly red and because I knew I'd never be able to tell which side was colored side up or down, which is kind of important, so I hedged my bets and did both side. Then, and remember to do this, I punched the hole for the jump ring with the stripe lined up on the background so that when I fused them I could attach the ring.
  2. Crank up the oven to 450 ℉. Oh, and also disregard my dirty dirty fingernails in the pictures, please. I've been crafting dammit, I don't have time for manicures!
  3. Using a glass dish, arrange the layers of your piece on top of each other as you would like them to appear. For the sake of color preservation, I would suggest putting the bottom layer color side up, then the next layer or two color side down. If you put the bottom layer color side down, it tends to get baked on the dish and pulls off of the shrink plastic and kind of ruins the effect. When you put the next layer/s color side-down, you get a nice glassy look, as well as a higher likelihood that the colors won't get distorted when the plastic starts to melt. Also make sure to line up any holes you plan to use in the future. These might get a tiny bit distorted in the fusing process, but I found as long as you don't really melt those babies, most of the holes I punched stayed pretty true to its original size/shape. With the flag, the bottom layer had to color so no need to worry about that but the stripes I made sure to put color-side down. The stars I kept getting really frustrated with because I'd think I had them color-side down and then think, wait, it looks like color on top, what the hell! Swearing like a sailor ensued as well as hair-pulling (I take Shrinky Dinks very seriously if you couldn't tell), then remembered my genius idea of coloring both sides just to be sure the color was maintained. Actually, to be honest, I just thought, to hell with it and just shoved them in the over. I only remembered this stress-relieving step I'd taken after I fused the piece. But I digress. I had to use my special, super sharp jeweler's tweezers to place star pieces and if you can tell in the fishbowl pictures, those air bubbles are tiny!
  4. Now, very carefully and without breathing slide your dish into the pre-heated oven and set a timer for 10 minutes or so. Depending on your kind of plastic and oven, it may fuse thoroughly in just that amount of time or it could take up to 30 minutes. It also depends on the effect you'd like: do you want to just get the layers stuck to each other and kind of soften the sharper edges of the outside of the piece or do you want to get a really melted and washed out effect like some art glass? Obviously, the longer you leave it in, the more melted and soft the layers become. I left the flag and fish bowl in for only 8 or 9 minutes since the shapes are so small and I didn't want to lose their integrity by being melted too much.
  5. You are done-zo! Aside from allowing it to cool, of course, which will take more time than when you take a piece out after simply shrinking them. If you're trying to make a ring or bracelet and want to shape your piece around a mold or form, this is the time to do it, but be very cautious. You can't just gingerly use your fingertips like when you only shrink them in the 350 ℉ oven. You'll need some tweezers or maybe a couple layers of latex gloves, not that the plastic will be like molten lava or anything, you just want to be careful with your fingers. The good part about this is that you'll have a little more time to actually get the right shape since the plastic is hotter and don't have to rush like I always did to get certain shapes when shrinking your dinks
Alright, that is enough for instructions, now for a couple more pointers when fusing:
  • Mix and match your types of plastic. That is, make one part the frosty/opaque (make sure these are always color side up, as the plastic doesn't become magically translucent or transparent as I had initially thought) with some crystal clear pieces for even more dimensional effect. However, for some reason on my first attempt at fusing I couldn't get my pieces to melt or soften on the edges. That time I had used two layers of the matter Poly Shrink brand plastic, and not the official Shrinky Dink brand, so that may have had something to do with it. I did manage to fuse the pieces into one, but the colors became really dark and muddy and it just looked awful… I may post a picture of what a failure I was or successfully challenged as I'd like to put it. Use the matte/frosty plastic if you want a stronger, opaque color that will hold its shape and gets less melty. The crystal plastic tends to lose some of the strength of its color and shape as it melts better or faster, I'm not sure which, and takes on a glassier effect.
  • If you happen to have a jewelry torch and think, hey, I'll be sooooo clever and just kinda hold the
    Don't even think about it!
    flame closish to the plastic and it'll shrink it faster and then I'll have more control over the effect and it'll be faster and I won't have to heat up my oven to 450 ℉ thus overheating the entire kitchen… not that those thoughts crossed my mind, I'm just saying, in case you happen to think of this… don't. When exposed to direct heat, which upon re-reading the instructions I realize they warn not to do, shrink plastic tends not only to char, it will go up in flames. Since they are shrinky dinks, luckily the piece only made a small bonfire that I easily blew out (it was like my birthday, yay! :/), but still, torches and shrink plastic don't mix.
  • Makers vs. colored pencils. It seems that every tutorial I've perused about shrink plastic says that sharpies and permanent markers work best for coloration, while colored pencils may be used if you don't have markers as long as you sand the plastic first. They also tend to say that permanent ink also keeps its color better than colored pencils, especially when you fuse. Maybe I have a magic oven or my colored pencils are magic wands or my permanent markers (Bic brand Mark-It) are cursed, but I've had the exact opposite experience. Whether I put the piece colored side up
    1st Fishbowl Attempt
    or down, the markers fade and bleed when fused, in fact, they fade and fuse even when just shrinking the plastic. This is especially apparent on the crystal clear Shrinky Dink brand, which is apparently the most difficult of the kinds of plastic to work with, but still, sanding and colored pencils have maintained their integrity far better than markers. But, like with different kinds of plastic, you can use these results to create different effects. In the 2nd fishbowl pendant, I used colored pencils on the fish, the plants, and the gravel, so that they stand out a little more and so the fish keep looking like fish since they are so small while I used markers for the outside border, water line, and water which creates a glassier and clear effect like you're expect from a, well, glass aquarium filled with water. On the 1st attempt using all markers, you can see the fish really washed out and you don't get the idea of fish in a bowl quite so easily, especially from afar. I also baked the bowl for that one color side down and it lost a lot of its color to the pyrex pie dish I baked it in (sorry mom, I'll clean, I swear). In the picture to the left, you can see the edges lost their color in some parts and the pieces on top are much softer than after an initial shrink of a dink. So, the readers digest version:
    • Sanding + colored pencils = stronger, longer lasting colors. Whether baked colored-side up or down, color maintains integrity.
    • Permanent markers + bare plastic = more transparent colors that tend to get a little watered down. If you sandwich the color between layers of plastic then fuse, the color stays a bit better, but still not as vibrant as when initially shrunk.
  • The amount you bake your plastic depends on your oven and type of plastic, but ultimately the effect you want to achieve will warrant the time you bake for. For the fish bowl and Chicago flag, I only baked them for 10 minutes, actually less now that I think about it, because I wanted the flag to actually look like a flag and not a melty failure of a salute to American colors, especially since those stars were so darn tiny. If I'd left that in there any longer those stars would've been blobs. You can see in the picture to the right how tiny the flag ended up after the first round of shrinking. Same with the fish bowl, since those fish were so small with tiny details I only wanted the pieces to be fused and stuck together, not melted. My 1st fish bowl attempt I left
    A flag in the hand is worth 2 in the… wait, never mind
    in for a full 5 minutes and I kind of liked how it all looked so watery and melty, but noticed the concept was slightly lost with such a small piece. Had I made it bigger in scale, I'd leave it in for that same amount of time or longer because you'd still be able to tell what everything was even with the soft edges.


Tuesday, March 19, 2013

Shrinky Dinky Done! And some Do's and Don'ts

Reliving childhood achieved! I was afraid making shrinky dinks as an adult would be one of those experiences that you remember from childhood as totally awesome, but when you try to recreate it as an adult it's woefully disappointing. Well, fear not, it was just as fun as I remembered.  It was especially fun since I have a toaster oven and could watch the entire shrinking process from start to finish. As soon as my pieces started to shrivel up I almost squealed with delight. I probably would have had my parents not been in the other room. I didn't really have a specific project in mind since I wasn't sure how the finished product would turn out so I just did a practice run and made a little drawing of a peony (one of my favorite flowers) and followed some pointers I found online beforehand.

Here are some tips I would like to pass along, as well as one thing that didn't work out so well. As I've only made a couple attempts with this oh so wonderful childhood invention, this isn't a complete list, but at least a couple to start out with:

Little baby ruler!
     
  1. Make a full size ruler and shrink it as a gauge. Genius, absolutely genius! This is one of the best suggestions I found so that you know exactly how much the plastic will shrink in my particular source of heat and I can tell how much my future pieces will shrink. This is great in case I make buttons for a piece of clothing I might make or "retrofitting" beads for a piece of jewelry I've already made, especially if I'm trying to sell it and want it to look as perfect as possible. I even marked flu-size measurements after I shrunk the ruler so I can flip it over and use it to measure going both ways (it also turned out looking like  an adorable little baby ruler afterwards).
  2. Key your eye on your pieces as they shrink. I'm fortunate enough to have toaster oven, which is the perfect heat source for dinks (as if I didn't already have enough reasons to love my toaster oven). I only made little pieces to start out with, but the larger ones tend to twist or curl onto themselves as they shrink so if you can watch them carefully you're able to use a chopstick (or whatever pointy long thing that isn't your own finger) to help flatten them out. But if you're patient they tend to flatten themselves out pretty well in my experience with my shrinking ruler. Here are some action shots if you're curious (and because it's fun to watch).
  3. Most of the other suggestions are found on the packaging. Bake the dinks on a piece of cardboard. I followed this step, mostly because I was afraid that if I baked them on a metal cookies sheet they wouldn't shrink, but instead grow and I'd have a giant ruler and HUGE MONSTROUS peony on my hands and they'd grow and grow and grow and take over my kitchen and smoosh me to death and my epitaph would be: "Death by Shrinky Dinks. Here lies Katy Manion, she truly loved her crafts. She lived as she died." Anyway I used cardboard and it worked out perfectly. 
  4. The ruler shrivels up like bacon!
  5. The other step to surely follow it to sand the plastic before you color it. The Shrinky Dink brand-name plastic has a pre-sanded frosty version that doesn't require this step, but I happens to have the Grafix brand that still needed a quick sanding so that the color could really sink in. Also along the lines of color, make sure you're light handed when it comes to coloring the plastic. I've read this suggestion before, but still felt compelled to really push when using my colored pencils, which turned out fine with the peony since I was going for a real color saturation with that and it was also a little bigger, but when I attempted smaller pieces with more black outlines it didn't turn out quite like I wanted. I made little leaf beads with black outline and veins. That combined with a much smaller size and the greens concentrating after the backing resulted in a slightly muddy look from further away and it was also harder to make out the shading of the greens I was hoping would be more noticeable. Depending on the effect you're going for, however, affects what approach to take. Just experiment like I did; this plastic is so wonderfully versatile you're bound to be able to find success.
There are endless possibilities for this re-discovered medium so if you're looking for a fun new project, go out and get some shrink plastic, on the double! Speaking of double, I here tell on the interwebs that you can double-bake or "fuse" shrink plastic. Apparently you bake it once, then bake again (surprise surprise!), but according to some tutorials I've read on the subject, it's a tad more complicated than that and require much practice and patience. After the first bake, you crank up the heat from 350 degrees to 450 and layer the two pieces in a pyrex dish (you leave one piece blank and put that one on top) and bake until the two melt to a glassy finish (about 8 minutes?). I have yet to try this and obviously this is an incomplete set of directions, but if I'm feeling adventurous in the near future I will attempt this one myself. Honestly though, I'm not done experimenting with the conventional use quite yet so it may be a while until this method gets its own blog entry, but I can guarantee it will happen.

If you're ever mid-project of any sort and think, "if only I had the right size and shape bead for this," or "I wish I had a bead with holes in the the right size and place for my wire," or you need just the right color, consider shrink plastic. It makes almost custom beads and you don't have to worry about breaking them like you might if you use polymer clay, which can crumble or shatter if it's too thin or you work it too much with wires or other materials. Once baked, the plastic is a good 1.5 millimeters thick and can take a fair amount of abuse. I needed a tiny spider for a certain piece and couldn't get the right look using conventional beads and it was next to impossible to get the wire legs to look right on top of that so I went back to the drawing board and then back to the shrink plastic. I was able to make the perfect little dink spider that held the legs perfectly in place as well as the other wires exactly where I needed them for the exact look I was hoping to achieve with minimal swearing as a result. I even screwed up several times with wire wrapping and no matter how many times I reworked it, the plastic stood up to the abuse and showed no signs of cracking or breaking.

Moral of the story: shrink plastic does not disappoint and it even better than I remember from my childhood (and yes, I am old enough to reminisce about my childhood!). Give it a try, it's cheap, fun, and versatile, what more could you ask for (other than a bottomless pint of Ben and Jerry's... I may have an ice-cream addiction...)?

Signing Off for now. Yours truly,
Katy

Now that I think about it, it may be a while before I experiment with fusing shrink plastic since my soldering torch (yes, a soldering torch!) has just been shipped to me and I will surely be diving right into that the minute my dog, Sadie, barks her head off at the UPS guy when he brings it to my front door, but it will surely make for an entertaining post since I will undoubtedly be cycling between absolute joy at being able to solder for the first time since my first metals class and sobbing in desperation because something didn't work out right and swearing like a sailor, throwing a failed project across the room. If my parents know what's good for them they'll have both the fire department and my therapist on call... can't wait!